See also: RIB Quickstart Guide
1.0 Introduction
2 Administering a
Repository
2.1 Creating a repository
2.2 Deleting a repository
3 Configuring a
Repository
3.1 Basic Interoperability Data Model (BIDM)
3.2 Configuring the data
model
3.3 Configuring the
domain hierarchy
3.4 Data model fields used
specially by RIB
3.5 Configuring access
control
4 Creating Asset Descriptions
4.1 "Create" action
4.1.1 Create
options
4.1.1.1 "Import" vs. "Add a
link"
4.1.2 Object creation form
4.1.2.1 What the fields mean
4.1.2.2 What to supply for each field
4.1.2.3 How to change the
form
4.2 Other actions
4.3 Results of object creation and
what to do next
5 Creating a Software
Catalog
5.1 Customizing the
appearance of the software catalog
5.2 Search interface
6 Repository
Interoperation
6.1 Adding/Deleting
Asset metadata
6.2 Automatic
link checking
6.3 List Local or Non-local Links
6.4 View catalog entries for each non-local link
7 Managing Software Files
7.1 Uploading software files
7.2 Mirroring software files
7.3 Creating Asset information for uploaded software files
7.4 Checking available disk space
8 Known Bugs and Problems
8.1 Lack of concurrency
control
8.2 Root access required for configuring
access control
8.3 Effect of access control
on interoperability
8.4 Access control with
Microsoft Internet Explorer v. 3.02
8.5 Access control and
moving between repositories
8.6 No support for FTP urls
in file mirroring
9 Future Plans
10 Figures
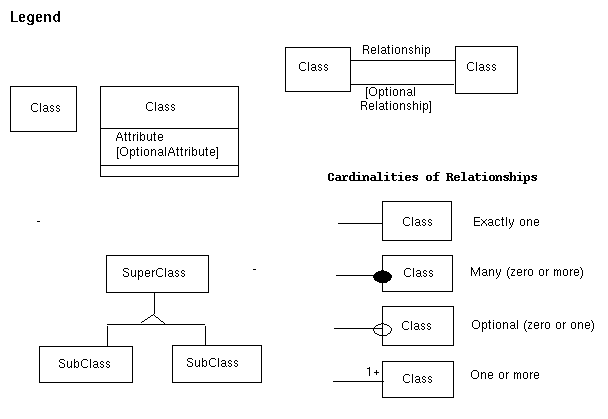
1.
Legend for Data Model Notation
2. Basic Interoperability Data Model
(BIDM)
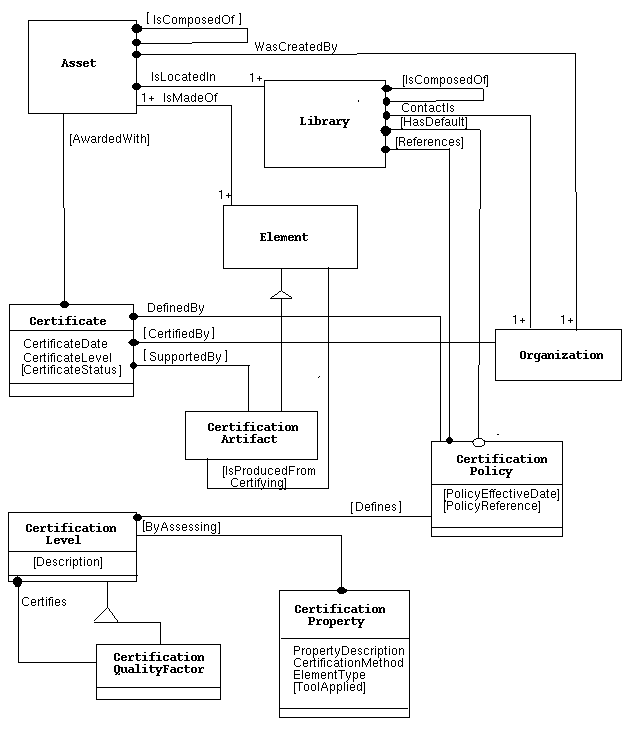
3. Asset Certification
Framework
1.0 Introduction
This user guide has been created to assist software repository administrators with the operation of the Repository in a Box (RIB) software. RIB is a toolkit for setting up and maintaining a software repository. The current release (version 1.2) includes facilities for creating and editing software catalog records, for generating a browsable, searchable HTML-formatted software catalog, and for interoperating with other RIB repositories. Instructions and guidance are also provided on the RIB administration pages in the form of on-line help which links to portions of this guide. Installation instructions and detailed access control information are provided in the RIB Installation Guide. Any problems or comments should be directed to the NHSE Technical Team.
To create a repository, click on "Create a new repository" from the administration page. Enter a name for your repository in the dialog box and click the "Create Repository" button or press Enter. The name you type in the provided dialog box should contain only alphanumeric (0-9, a-z, A-Z), dash (-), and/or underscore (_) characters and should not contain any spaces. The name should also be descriptive since other pages of that repository will use the name provided. Once a repository has been named and created, it cannot be renamed.
If the repository was successfully created, all of the
directories and subdirectories created and copied for that
repository will appear on the screen followed by the word
Success at the bottom. Below is a description of the four
subdirectories that will be created as subdirectories of the
directory created with the repository name you supplied. For
example, if the RIB was installed in the location listed
below
and you create a repository with the name Math, the
following will happen. 1) A directory will be created with the
name Math (same as the repository name). 2) The five
subdirectories listed below will be created inside the
Math directory. 3) Several subdirectories will be
created inside each of these. The directory structure will then
appear as
In addition, a directory will be created in the RIB cgi-bin directory where the scripts for administrating that repository will be placed. This directory will be at the location RIBDIR/cgi-bin/admin/repositories/REPONAME. RIBDIR is your RIB installation directory and REPONAME is the name of the new repository.
If you are not sure where your repository resides, check with the person who installed your RIB software or your system administrator.
When a repository is created, an administration form is
created from which you can administrate that particular
repository. By clicking on "You may now start using this
new repository" link, you will be taken to the administrate
page from which you may begin configuring the repository,
creating asset descriptions, generating a software catalog, and
interoperating with another repository.
catalog -- HTML software catalog that will be visible to users of your repository
conf -- BIDM (see section 3.0 Configuring the Repository below) and domains configuration files that you can customize for your repository
objects -- contains additional subdirectories corresponding to each of the object classes in the BIDM. This subdirectory contains the metadata records for each new repository. The classes used in the BIDM are the default classes used in each new repository.
index -- index files used by the search engine
files -- software files uploaded to this repository
2.2 Deleting a RepositoryWhen you delete a repository, RIB will remove the disk copy of the repository's directory and all of its subdirectories. These subdirectories include the configuration and domain files, the object description files, and the software catalog. Thus, before you take this drastic step, make sure that you no longer need any of these files.
Back to Table of Contents3.1 Basic Interoperability Data Model (BIDM)
The NHSE Repository in a Box (RIB) uses IEEE Standard 1420.1, the Basic Interoperability Data Model (BIDM) along with the Asset Certification Framework (ACF) extension to the BIDM, for the data model for software catalog records. IEEE Standard 1420.1 may be purchased by contacting the IEEE at 1-800-678-IEEE. The BIDM was developed by the Reuse Library Interoperability Group (RIG) which has evolved into the Reuse Steering Committee (RSC). More information about the may be found at the RSC Web Site.
The BIDM consists of classes that have attributes and relationships with other classes. The four BIDM classes are Asset, Element, Library, and Organization. An Asset is any reusable entity in the software life cycle process -- e.g., a software package or routine. An Element is a single file. A Library contains assets. An Organization may be a person, company, research group, etc., that creates and manages an Asset or Library. The ACF extension to the BIDM includes additional classes for information about Asset Certification, also called software review or evaluation. Definitions of these additional classes are provided in the Glossary.
The data model is best illustrated using the graphic notation of James Rumbaugh's Object-Oriented Modeling and Design. Figure 1 provides a legend for the graphic notation.Figure 2 illustrates the BIDM model.
The Asset Certification Framework (ACF) extension to the BIDM is used by reuse libraries to describe their certification policies and to exchange certification metadata. The ACF adds an AwardedWith relationship to the Asset relationships shown above. A pictorial view of the additional ACF classes is shown in Figure 3.
3.2 Configuring the data model
The RIB allows a repository creator to customize the BIDM, and to change the appearance of the software catalog that is built from the underlying catalog records, by changing the RIB's BIDM configuration file.
By default, RIB uses a simplified version of the BIDM.
Asset and Organization will be the only classes
that initially appear on the administration page after a new
repository has been created. Other BIDM classes may be added
selectively by changing the BIDM configuration file
Some restrictions are imposed on what modifications may be made to the BIDM configuration so that all NHSE repositories (either your own or at another repository site) can interoperate by exchanging BIDM catalog records. You may change whether a field is required or optional. You may also change the allowed multiplicity of a field from multiple to single. If you do not wish to use a BIDM field, it may be omitted. You may also omit a BIDM or ACF class that you do not wish to use, although in that case you must be careful never to specify any relationships to that class in a catalog record. You may also add attributes and relationships to the existing BIDM classes, but you may not create new classes. However, future versions of RIB will allow creation of new classes (in fact, all modifications will be done by a subclassing mechanism). A repository should not use an existing BIDM field for a different meaning than it is intended. Furthermore, if a field already exists for a given purpose, then a repository should not create another field for that purpose with a different name.
To configure the data model for your repository, select one of the examples below (or create your own from scratch), save to a file, and edit. Then go to your repository's administration page and input the URL for your new configuration file. If you have software review or evaluation information, you should start from either the full BIDM or the NHSE modification of the BIDM, both of which include the Asset Certification Framework (ACF) extension which is used for such information.
Example BIDM configuration files:
As you can see from the examples, the BIDM configuration file has an SGML-like format. The definition of each BIDM object is enclosed within the CLASS start and end tags. Note that in customizing the BIDM configuration file, you may omit classes from the full BIDM, but you not may not add any. Within each class are defined the attributes and relationships for that class. An attribute definition is enclosed within ATTRIBUTE start and end tags. A relationship definition is enclosed within RELATIONSHIP start and end tags. The order in which the attributes and relationships are listed for a class determines the order in which they appear on the RIB object creation form for that class, as well as the order in which they appear in the displayed asset pages in your repository's software catalog. Class, Attribute, and Relationship names must consist entirely of alphanumeric characters (e.g., 0-9, a-z, A-Z) and not begin with a number. The name of a class, attribute, or relationship cannot contain whitespace. The allowed modifiers for the CLASS, ATTRIBUTE, and RELATIONSHIP tags are as follows:
CLASS
| name | name of this class |
| extends | parent class |
ATTRIBUTE
| name | name of this attribute |
| req |
present if attribute is required |
| mult |
present if attribute can have multiple values |
| dtype |
datatype of the attribute: string (at most 1024 characters), text, date, email, or url |
| alt |
alternative name for the attribute that will appear instead in the software catalog |
| noshow |
present if attribute is not to appear in displayed asset page |
RELATIONSHIP
| name | name of this relationship |
| req |
present if relationship is required |
| mult |
present if relationship can have multiple destinations |
| dest |
destination class for the relationship |
| alt |
alternative name for the relationship that will appear instead in the software catalog |
|
hidden | present if relationship is not to appear in displayed asset page |
3.3 Configuring the domain hierarchy
One of the BIDM fields is domain, which is intended to be used with a classification scheme. The RIB allows a repository creator to specify a domain hierarchy in HTML list format that gives the controlled vocabulary to be used for this field. With RIB, the domain hierarchy and the domain values in the software catalog records determine how the software catalog table of contents is organized. See the PTLIB domain hierarchy for an example.
3.4 Data model fields used specially by RIB
3.5 Configuring access control
This section addresses access control from the point of view of the administrator of a RIB repository. Information about overall access control for the entire RIB installation, as well as more detailed information about access control for individual repositories, may be found in the RIB Installation Guide.No access controls are enforced by your RIB installation by default. Instead, access control for RIB is activated by enabling the access control mechanisms of your HTTP server. The actual mechanisms for access control vary depending on what HTTP server you are using, but as long as your HTTP server allows access control based on directory name you should be able to configure your RIB installation to meet fairly rigid security requirements. If your HTTP server supports what is called Basic HTTP Authentication, then you will be able to achieve a minimum level of security. If your HTTP server supports features such as SSL (secure sockets layer) or X.509 certificates then you can achieve much higher levels of security. Consult your HTTP server documentation or your system adminstrator for information on what security features are supported and how to enable and configure those features. Unless you have root access to your machine, it will probably be necessary to ask your system administrator to configure your HTTP server's access controls. Depending on the security policies for the server machine, this might involve editing the HTTP server's configuration files or copying a special file (called .htaccess by some HTTP servers) into the access controlled directories. Because the directories created by RIB when a repository is created are writable only by the user and group of the HTTP server, adding .htaccess files to these directories will normally require root access.
Access control mechanisms can be divided into two main types : authentication based on host name and authentication based on username/password pairs. When used together, these two types of authentication provide a reasonable amount of access control for RIB repositories. Using the combination of these two types of access control, for example, you can specify that anyone who accesses your repository from a machine whose hostname ends with the suffix .goodguys.com is allowed to browse your software catalog but not allowed to administer your repository. You could require a username/password combination in addition to any hostname requirements in order to administer your repository. [NOTE: If you protect an area of your repository with username/password authentication, it is important to ensure that anyone needing to access that area uses a Web browser equipped to handle username/password dialogue boxes. Because authentication based on hostname is not handled by Web browsers, it places no requirements on them.]
When you create a new repository, the following directories should be considered for access control:
See also: RIB Quickstart Guide
What is an asset?
An asset can be any reusable product of the software life cycle, but is typically a software package or routine. Assets are what you want to make available to users of your repository. To enable users to find the assets they need, you need to create asset descriptions which will be used by RIB to build a browsable, searchable software catalog. Asset descriptions can be edited but changes will not appear in the catalog unless the catalog is regenerated. This is covered in more detail below in section 4.3 Results of object creation and what to do next
Before you start to create asset descriptions, you need to first configure your repository's data model and domain hierarchy, if you have not already done so.
Asset descriptions are based on the Basic Interoperability Data Model (BIDM), described in section 3.1. An asset description consists of fields, where each field is either an attribute or a relationship. A relationship points to a description of another related object, such as the author of an asset.
Object descriptions are created by using the "Create" option for a class under the "Create Asset Descriptions" heading on your repository's administration page. All classes have the same options once you click on the "Create" link. The class Asset has an additional option which is found on the administration page under "Interoperate With Another Repository"
(1) Create a new object
Clicking on this option takes you to a blank object creation form where you may enter information about the object. Once the information has been entered, check the box at the bottom of the page and click the button beside it. Any input boxes that are left blank will be ignored unless the box is for a required field. Leaving a required field input box blank will result in an error message.
(2) Import an object
Clicking on this option takes you to a form where you may enter a URL for an existing metadata file which will usually reside in a different repository. Provided the URL is valid and the metadata is in the correct format, the metadata will be loaded in an editing form so that you may modify it and save it as an object description in your own repository. The "import" action provides your catalog with a "snapshot" of the existing metadata from the repository it was taken from. As a result, regeneration of the catalog will not yield any new metadata. In other words, metadata which is "imported" from a foreign repository may become stale because the metadata is not dynamically updated each time your catalog is regenerated. This data is like a "hard copy" of the foreign repository's Asset metadata that will not be changed in your catalog unless you elect to edit it or reimport it. In other words, any updating done to an Asset's metadata by the foreign repository's maintainer will not be reflected in your catalog unless you reimport it once you have chosen to use the "Import a link" action from the "Create" action on the administration page.
The "Import a link" action is different than the "Add a link" to an Asset option which takes the metadata from another repository each time you regenerate your catalog. See section 6 Repository Interoperation for more information. Note that any objects that are destinations or relationships of an "imported" object will be resolved via remote URLs at the time when your software catalog is created unless you also import the relationship destination objects.
When an object is imported from another repository, it will often have objects that are relationships to the object you have imported. Any relationships are bound by the url of the imported object and are thus not retrieved. The urls to those relationships will be retrieved but the objects of those relationships will not.
4.1.1.1 "Import" vs. "Add a link"
The decision whether to use the "import" or the "add a link" option for an asset (or whether to use the "import" option for an object of a non-asset class or just add a link to it from the asset creation form) depends on the following factors:
In the "Add a link" case, the entry for the foreign object will be automatically updated the next time you regenerate the catalog. In the case of "import" however, you will need to manually update the copy of the object's metadata in your repository before regenerating the catalog.
See the BIDM data model summary if you are unfamiliar with NHSE software cataloging methodology. You may also click on any field name to find out what it means. The field names are also defined in the Glossary.
4.1.2.2 What to supply for each field
You must supply a value for all required fields. The value that you input may be simple text or you may be required to input a url. If you are unsure what to type in the input box provided, click on the field name for a brief explanation of what information is needed for that field. Note that there are two types of fields -- attributes and relationships. Field names are identified in parenthesis as Attribute, Relationship, Required, or Optional on the "Create" page.
Attributes: For attributes, you enter a value for the field.
Relationships: For relationships, you enter a pointer to another object, and the pointer may be either a filename in your local (your own repository) object directory, or an absolute URL which may point to a nonlocal (a foreign repository) file. The destination of the pointer must already exist, but you may click "create new" to create a new local object of the destination class. Click "browse" to see what objects already exist locally for the relationship destination class.
4.1.2.3 How to change the form
For fields that may have multiple values, you may request another input box by clicking "Add a field" and then clicking "Update" to get a new form with an additional input box for that field. You may request additional input boxes for several fields at the same time and just click on any of the "Update" buttons to update the form. You may also delete the last field in a similar manner. To undo a click on "Add a field" or "Delete last field" click on "Cancel"
4.3 Results of object creation and what to do next
After you submit an object creation form, RIB creates an HTML file containing a machine-parseable object description in the HTML header. A viewable object description is also placed in the body of the file for your viewing convenience, but this part is not functional. The object description files can be exchanged with other repositories that also use the BIDM.
After you have created (or edited) one or more asset descriptions, you will need to go to the next step, which is HTML Software Catalog generation (or regeneration if the catalog already exists), which will use the object description files to create a browsable, searchable HTML-formatted catalog of your software assets.
After you have created some asset descriptions, you can ask RIB to use those descriptions to build a browseable, searchable HTML-formatted catalog of those assets that can be displayed to users of your repository. When you click on "Re)generate Software Catalog" RIB will (re)create the following:
The following are examples of software catalogs that were created using RIB:
5.1 Customizing the appearance of the software catalog
RIB allows you to install your own header and footer files for both the software catalog table of contents page and the HTML pages displayed for the individual assets. This will enable you to name the software catalog whatever you want and link to it from your own site. There are two different pages which use a header and a footer. To import the files which get prepended and appended to the pages, go to the adminstration page for the repository and click the appropriate 'import' link in the 'HTML Software Catalog' section.
RIB uses the Isearch text search engine from CNIDR for the search interface to your repository's software catalog. The Isearch index files are automatically created (updated) whenever you generate (regenerate) your software catalog. The current version of RIB provides only full text searching of the entire catalog, but future versions of RIB will provide field-specific searching.
If you create a catalog and it doesn't contain a search form at
the top of the table of contents then the isearch software was
probably not installed when RIB was installed at your site. If
you would like to add support for isearch to your installation
of RIB then please see the RIB installation documentation which
came with the RIB distribution package. There is also a copy of
the installation documentation available at
RIB home page.
Repository Interoperation
6.1 Adding or Deleting a link to a foreign repositories Asset metadata
By default, the machine-parseable versions of the metadata for your repository's assets and other objects are accessible to other repository maintainers via your HTTP server at the URL for your repository's object directory. A pointer to an asset's metadata is also present at the bottom of the software catalog entry for the asset. Likewise, metadata in other RIB repositories is accessible to you (unless it has been password protected).
As mentioned previously in an earlier section of this guide, there are two ways to incorporate "Asset" object metatdata from another repository into your repository's software catalog. The metatdata can be "Imported" or "Added" The "Import a link" action brings the foreign asset's metadata into an edit form where you may edit it and save it in your own repository. "Imported" metadata is not dynamically updated each time you regenerate your catalog. More information about this option may be found in section 4.1.1 Create options.
The "Add a link" option allows you to specify a link so that the foreign asset's metadata will be incorporated into your repository's software catalog each time you regenerate your catalog. In this case, the metatdata is dynamically updated and any changes to the Asset made by the foreign repository housing that metadata will be reflected in your catalog when you regenerate it. Using the "Add a link" option will ensure that the metadata in your catalog that was taken from another repository remains up-to-date. However, one drawback of adding a link is that the metadata could disappear from the foreign repository all together. As mentioned previously, the "Add a link" option is found on the administration page in the "Interoperate With Another Repository" section.When using the "Add a link" feature, you can choose to add links one at a time or you can add a collection of links. For example, you may want to incorporate the metatdata of one Asset from a foreign repository into your repository or you may want to incorporate the metatdata of several or all assets from another repository into your own. There is a link to both actions from the "Interoperate With Another Repository" section of the Repository Administration page.
Deleting a link to a foreign repository's Assets allows you to remove links to foreign Asset's from your repository catalog. Choosing this action will remove the metadata the next time you regenerate your catalog.
Metadata for foreign objects of classes other than "Asset" may be incorporated into your repository also in two ways. One way is to use the "Import" option available on the object creation page for that class. The second way is to specify the URL for the foreign object's metadata as the destination of a relationship on the Asset creation form.
The "Check to see if Assets linked to by this repository have changed" option under the "Interoperate With Another Repository" heading on the Repository Administration page allows a repository maintainer to run a script that checks whether the contents of any linked asset description files have changed. If changes have occurred, the maintainer will need to regenerate the software catalog to have these changes picked up. NOTE: This option will only check those non-local links (links from another repository) that were added via the "Add a link" option. "Imported" links are not checked because, as mentioned previously in section 4.1.1 Create options, these links are not dynamically created.6.3 List Local or Non-local Links
Under the "Interoperate With Another Repository" section of the Administrate Repository page is the option to see the url for each Asset currently residing in your repository that was created by using the "Create" or "Import" action. This url list will be alphabetized so that individual Assets can be located easily.
Similar to listing local links, you can generate a url list of non-local Assets (those added to the repository via the "Add a link" action) residing in your repository.
6.4 View catalog entries for each link
Similar to retrieving a list of local and non-local links, this option allows you to view the url of each non-local entry in your repository's catalog. All urls are displayed in alphabetic order.Starting with version 1.2 of RIB, you can use the administrative interface to upload files to a repository. To use this feature, go to your repository's administration page and click the link entitled "Manage software files for this repository" which is near the bottom of the page. If there are currently any files uploaded to this repository then you will see a listing of those files along with some information about those files. Otherwise, you'll just see a link for uploading a file and a link for checking available disk space.
To upload a file click on the link entitled "Upload a file". When the form is returned, input the url where the file can be uploaded from. The url can use http (http://), ftp (ftp://), or gopher (gopher://). Specify your email address in the appropriate input box; this is where the results will be sent to. If the file is password protected then enter the username and password in their input boxes. If you would like to set up a mirror for the file (see section on mirroring software files for more information on this option) then check the box beside "Set up a mirror for this file";.
When you have finished filling out the form then click the Submit button and the file will begin uploading in a background process. If you specified an email address in the form then you will be notified when the upload has finished. Otherwise, the upload process will finish silently without notifying you of its success or failure. It is highly recommended that you have the results sent to an email address because you would otherwise not know about any errors that occurred.
RIB allows you to mirror files from a master site and to periodically check to make sure your mirrored copy is up to date. Setting up a mirror for a file is a lot like the process for uploading a file which is described in "Uploading software files". When filling out the form for the upload, check the box beside "Set up a mirror for this file".After the file has finished uploading, a url to the master copy is stored in the repository. Whenever you want to check to make sure that the mirrored file is up to date go to the top level software files management page and click on the link entitled "Update the mirrored files in this repository". This option will check each of the files that you have set up a mirror for and will update your mirrored copy if necessary. Like the upload process, the process of checking your mirrored files will run in the background - you won't see the results of the process unless you specify an email address.
It is important to note that mirrored files are not automatically kept up to date - you need to click on the "Update the mirrored files in this repository" link when you want to update your mirrored copies. However, if you have a sufficient level of access to the machine that runs RIB then you can create a cron job which updates the files on a regular basis without the need for direct intervention. If you can create a cron job for the http user on your RIB machine (usually the user "nobody") then you can run the script "update_mirrors.pl" which is in the directory RIBDIR/cgi-bin/admin/repositories/REPONAME/. RIBDIR is your rib installation directory (usually /usr/local/rib) and REPONAME is the repository name. Before running the script you should change to the directory where the script is kept. For example, the shell syntax for starting the command might be :
cd /usr/local/rib/cgi-bin/admin/repositoires/my_repository && ./update_mirrors.pl
It is important to note that this script should only be run as the http user to prevent problems with file permissions.
At this time the only type of url that RIB should mirror are http urls (i.e. http://...). This is because other protocols, such as ftp, do not support the If-Modified-Since header that RIB uses to check the modification date of the master copy of a file. We plan on adding support for ftp urls soon, since ftp is sometimes the only available protocol for downloading files. Until support for ftp is added to RIB mirroring, the only type of url that will be mirrored correctly is http. Any other type of url will always be downloaded again when the "Update the mirrored files in this repository" link is clicked, regardless of whether or not the file has changed.
7.3 Creating Asset information for uploaded software files
After you have uploaded a file you will usually want to create an Asset description for that file so that it will appear in the repository's software catalog. Notice that on the top level software files management page that there is a button entitled "Create" in the row containing information about the file (if you don't see this button then read on for an explanation). When you click on this button a form will be presented with the url for this file already loaded into the form.
If the configuration file for this repository contains the class Element and if that class contains the attribute UniqueID then you'll jump into the Element creation page when you click the create button. This will be the case if you are using the Full BIDM configuration file or the NHSE configuration file. If your configuration file does not contain the class Element then the class Asset (which should always be present) is checked to see if it contains the attribute File. This will be the case if you are using the Simple configuration file, which is the default configuration file for a newly created repository. See "Configuring the data model" for more information about RIB configuration files. If your configuration file meets neither of the conditions above then there will not be a button for creating Asset information.
If an Asset creation form is loaded when you click the Create button then the File attribute will already be filled out in the form. Just complete the form and submit the Asset description to add it to your catalog.
If an Element creation form is loaded when you click the Create button then the UniqueID attribute will already be filled out in the form. Go ahead and finish filling out the information for this Element and submit it. After you have created this Element description you will need to create an Asset and use the relationship IsMadeOf to link to the Element description. Then you can generate your catalog and the file will be available for download from your repository.
Note : as of version 1.2 of RIB (released 1/98) a new attribute (File) has been added to the Asset class in the Simple (default) configuration file. If you are using a repository that is using the Simple (default) configuration file and that was created with a version of RIB before 1.2 then you will need to edit your configuration file and add the File attribute to the Asset class. If this attribute is not present in your Asset class, and if you don't use the Element class, then you will not see the "Create" button that is discussed above. After you add the attribute the button will appear. To edit your configuration file you need to go to the repository administration page and click on the "edit configuration file" link. Alternatively, you can just re-install the Simple configuration file by clicking on the "Simple" button near the top of the repository adminstration page (note that this will overwrite any changes you've made to your current configuration file). Any repository created using a version of RIB later than 1.2 will already have the File attribute in the Asset class.
7.4 Checking available disk space
Files that are uploaded to a RIB repository are stored in the directory RIBDIR/repositories/REPONAME/files. RIBDIR is the RIB installation directory (usually /usr/local/rib) and REPONAME is the name of the repository. It is important to keep an eye on the amount of disk space that is available in this directory. Therefore, RIB provides a utility to check the disk space by clicking on the link entitled "Check disk space available for this repository" on the main administration page for the repository.
RIB depends on a standard UNIX program called df to check the available disk space. If the df program is not present on your system or cannot be found by RIB (the PATH environment variable for your http user is used to look for this utility) then RIB will not be able to check disk space. If RIB cannot check the disk space then you will need to manually check the amount of available disk space by logging into the machine that runs RIB and using the appropriate system utility.
8.1 Lack of concurrency control
RIB is implemented over the file system and does not use file locking with the exception of the cases described below. Thus, it does not have concurrency control. For example, if two repository maintainers are updating the same catalog record simultaneously, a race condition can occur. Future versions of RIB will be implemented over an underlying database and thus will have concurrency control.
The exceptions where file locking and thus concurrency control has been implemented in RIB is for access to the list of links to foreign objects, and access to the list of mirrored software files. The file containing the list of links to foreign objects is locked during the deletion operation for deleting a link from the list. Add operations to this list use an append operation and thus are serialized and will not cause a race condition, except for the order in which links are added. The file containing the list of mirrored files is locked when any time the file is being read or modified.
8.2 Root access required for configuring access control
Because the directories RIB creates when a new repository is created are writable only by the HTTP server user and group, root access is normally required to place access control files in these directories. Also, since RIB uses cgi scripts as its interface to the local filesystem, the files created by RIB are writable by the userid that runs the HTTP server (on most UNIX systems this is the user 'nobody'). Therefore, anyone who has permissions to create and run cgi-scripts on the machine where RIB is installed can access and/or modify the files used by RIB. This is because their cgi scripts will run under the same userid that RIB runs under. For more information about access control, see section 3.5 Configuring access control or check the RIB Installation Guide.
8.3 Effect of access control on interoperability
Interoperation with another repository by sharing its object metadata is normally done by using the "Import" or "Add a link" options on the object creation page. Because the RIB software cannot retrieve access-protected objects, however, URLs that are access-protected cannot be imported or added as links. If you can normally retrieve the access-protected URL with your Web browser, however, for example by entering a username and password, then you can save the file temporarily to an unprotected location (either on the local filesystem or on a Web server) and import from there.
8.4 Access control with Microsoft Internet Explorer v. 3.02
Use of the RIB with Microsoft Internet Explorer version 3.02 reveals that the browser can behave inconsistently when accessing protected areas. The username/password pairs protection may not function properly. This problem does not threaten the security of the RIB but limits its functionality in certain situations.
8.5 Access control and moving between repositories
When you attempt to select a repository to administrate from the top-level RIB administration page, you may get a message that authorization has failed. This will happen if the administrative access control for the selected repository is different from that for the top-level page. Each individual repository may have its own access control so that only certain users can have access to certain repositories. Navigating between repositories may thus require you to use different username/password pairs for access. If you receive the authoriztation has failed message, retry the authorization and give the correct username and password for the selected repository. Refer to the RIB Installation Guide for help configuring access control.
8.6 No support for FTP urls in file mirroring
At this time the only type of url that RIB should mirror are http urls (i.e. http://...). This is because other protocols, such as ftp, do not support the If-Modified-Since header that RIB uses to check the modification date of the master copy of a file. We plan on adding support for ftp urls soon, since ftp is sometimes the only available protocol for downloading files. Until support for other protocols is adding to RIB mirroring, the only type of urls that will be mirrored correctly is http. Any other type of url will always be downloaded again when the "Update the mirrored files in this repository" link is clicked, regardless of whether or not the file has changed.
Figure 1. Legend for Data Model Notation
Figure 2. Basic Interoperability Data Model
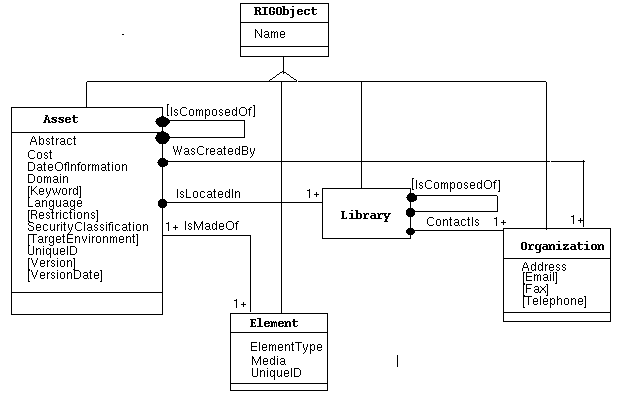
Figure 3. Asset Certification Framework
(RIGObject class and attributes for original BIDM classes omitted)
GLOSSARY
Abstract - general definition or explanation of
an asset.
Address - in Organization, the mailing address of the
organization (or person). Includes street number, name, city, state,
zipcode, and country.
Attribute - a characteristic of a class for which
a value may be given for an instance of that class.
Asset - any reusable entity in the software life cycle
process (e.g., a software package, tool, or routine).
AwardedWith - relates an asset to a certificate that
states that the asset has been assessed or evaluated according to
specified evaluation criteria.
BIDM - Basic Interoperability Data Model
Certificate - software review or evaluation.
CertificationArtifact - a tangible result from a
certification process (e.g., inspection checklist, metric report).
CertificationLevel - Certification level awarded to an
asset by a certificate.
CertificationMethod - the method applied in assessing a
certification property (e.g., inspection, static analysis, testing,
formal verification, benchmarking).
CertificationPolicy - The policy used for the certification
process of the Asset.
CertificationProperty - A feature or characteristic
of an asset that may be assessed during a certification process.
CertificationStatus - status of the certificate (e.g.,
approved, rejected, in progress).
CertifiedBy - indicates the organization that issued the
certificate or performed the certification process.
Class - type of BIDM object
ContactIs - An organization that is a point of contact
for a library or asset (an organization can be a person).
Cost - the type and amount of fees a subscriber must pay
to obtain the right to reuse an asset, including type of currency paid
and pricing policy for maintenance support and upgrades.
DateOfInformation - the date the information about an
asset was last updated.
DistributionStatement - an indication of who may receive
an asset.
Domain - a broad area of interest, application area, or
area of activity or knowledge.
Element - a file that is part of an asset
ElementType - the kind of element (e.g., source code,
test suite, makefile)
Field - an attribute or relationship.
Icon - the url for an icon that graphically represents
or provides information about the asset.
IsComposedOf - indicates an asset that is a subset or
part of an asset.
IsLocatedIn - indicates a library (i.e., repository) in
which an asset is located.
IsMadeOf - indicates an element (i.e., file) that is
part of an asset.
Keyword - a word or phrase that describes the asset.
Language - programming language used to express one or
more elements of an asset.
Library - repository that contains assets.
Local - found in the repository currently being administrated.
Media - the media through which an element can be
obtained (e.g., Cd-ROM, electronic, etc.).
Name - name or title of an object
Non-local - found in another (foreign) repository.
Object - an instance of a class.
Organization - a person, company, research group, etc.
that creates and manages an asset or library.
PolicyEffectiveDate - date the CertificationPolicy was
made effective for the organization.
PolicyReference - reference to document(s) or standard(s)
that define a CertificationPolicy.
PropertyDescription - a statement about some feature or
characteristic of an asset that may be assessed as being true or false
during a certification process.
RecordMaintainedBy - an organization (see Organization)
that is responsible for maintaining the catalog record for an object.
Relationship - a relationship between two classes,
expressed by a link from an instance of the first class to
an instance of the second.
Restrictions - legal information governing the use of
the asset, including possibly copyright, patents, data rights,
disclaimers, export restrictions, and licenses.
RIB - Repository In a Box
RIG - Reuse Library Interoperability Group
SecurityClassification - the highest security
classification assigned to the asset or to any part of it.
TargetEnvironment - computer system, operating system,
and/or compiler for which an asset was developed or on which an asset
will operate.
ToolApplied - reference to the automated tool applied in
support of the CertificationMethod assessing the
CertificationProperty.
TitleLine - a one line description of an asset.
UniqueID - a name or handle used to refer to the set of
data that makes up the identity of the asset or element.
Version - the designation of the version of an asset
(usually a number).
VersionDate - the publication date for the given version
of an asset (i.e., the date the asset was made available for public
use).
WasCreatedBy - an organization (see Organization) that
originated or produced an asset.
Webpage - the url for the home page of the asset.